Friday, October 30, 2009

The Month of Crazy Has Begun

And by crazy, I mean travel-crazy.

This week? I was here:
1028_2811bl

Next week? Wait and see.

Tuesday, October 27, 2009

A Not So Quick (or Easy) Fix

Not all of our house projects go as smoothly as hanging bamboo shades in our laundry nook.

Not surprisingly, our attempted DIY bathroom renovation hasn't been nearly so easy.

1018_2692bl

We have a half bath on our main floor that desperately needed to be pulled out of the 80's. Check out the ugly light fixture, the dated mirror, and (my personal favorite) the sea shell sink.

1018_2339bl


1018_2342bl

1018_2330bl

We stopped by Menards (I heart Menards) on a Sunday afternoon and picked up a new vanity top and faucet. That night I watched a number of DIY home improvement You Tube videos, and felt confident that we could install the thing ourselves. It just didn't seem too difficult.

And it wouldn't have been, had the vanity top been a quarter inch narrower.

We tried and tried and tried to get that dang thing in the bathroom. And let me just tell you - a 36 x 22 inch vanity top made of cultured marble is HEAVY. We scraped up the drywall in several places, took off the trim around the door, tried a number of different angles, and then stopped.

Uh... maybe we should measure it, Josh said.

It was then that we discovered that our sink was just a leeettle too wide for the room. As in, there ain't no way we're getting this in here.

35.75 inches across:
1019_2673bl

36 inches across:
1019_2677bl

Some explitaves may have been spoken that night.

In the world of home improvement, I've learned, there are standard sizes and custom sizes. 36 inches across is a standard size for a vanity top. 35 inches would require a much more expensive custom-made vanity top. And that didn't exactly fit into our budget.

Junk.

In the end, I called a random granite/tile company from the phone book, and the guy agreed to trim the edges. Whew. It did require me to drive across town to bring it there and pick it up, plus $40, but it was worth it.

Now the new vanity is in, and the new faucet works, and at this point nothing is leaking (knock on wood). So we're good. When the bathroom is complete, I'll post pictures.

And here are a few lessons I've learned in this process:
1. Measuring accurately is very important.
2. Home improvement projects will usually take more time than you think they should.
3. Disassembling a vanity isn't difficult. Just be sure you turn off the water first.
4. When you're trying something new in the world of home improvement, You Tube is your friend.
5. I can't wait to pull out the FOUR other sea shell sinks we have in this house.

Tuesday, October 20, 2009

A Quick Fix

So our washing machine and dryer are on the main floor in a little stretch of hallway between our garage and the rest of the house.

1007_1367bl


In my opinion, this is a pretty convenient place for the "laundry room" (aka laundry closet without doors) to be - right off of the eat-in kitchen and close to the family room. Perfect for those of us that need to watch TV when they're folding clothes, which in my opinion helps take the edge off of the boring chore.

Due to its' location, the laundry nook also ends up being a bit of a dumping grounds. The dog's leash, my purse, fabric softener, and dirty clothes all seem to collect here, and it is just a bit unsightly.

1007_1365bl


The solution?  An idea I stole right from these guys.

1007_1371bl


At $25 a pop these shades are the perfect way to close off this area when we have people over. I don't think it is necessary to hide away the laundry nook completely, but they definitely serve to tidy up our messy nook. Especially important since this is in such a main part of our house. Cheap and easy (they took about 15 minutes to put up) - my kind of project.

laundry

Saturday, October 17, 2009

Pumpkin Chocolate Chip Pancakes

1013_1735-1bl

There's really no special recipe here.

It's just this (made according to directions):
1013_1721bl

Plus this (chopped up):
1013_1722bl

And it equals this:
1013_1730-1bl
I don't even need syrup or butter for these. They're perfect as-is.

Yes, I love pumpkin-related food just as much as I love apple-related food.

Beyond that, I truly and wholeheartedly love Trader Joe's. Having one within a couple miles of my house is one of the best parts of living in the Columbus area.

... And I'm going to need to stock up on that pumpkin pancake mix while it is still in season. To. Die. For.

Friday, October 16, 2009

Apple Crisp

No fall recipe series could be complete without the mack daddy of fall recipes -

Apple Crisp.
1011_1358bl

I found this recipe online and decided it to try for a number of reasons:

A. There were no nuts involved. I really dislike nuts in all baked goods.
B. I already had all of the ingredients, and wouldn't need to make a special trip to the store.
C. It looked easy.

Then I just tweaked it and made it my own.
1011_1351bl-1

It was delicious. I almost ate my entire piece before remembering that I wanted a picture of it.
1011_1360bl-1

Crunchy on top, gooey on bottom. Just my style.

I made it on Sunday for our small group from church, and it was well received. Everyone else ate theirs with vanilla ice cream, but eating dessert a la mode isn't my style. It never has been. However, I know that this recipe is generally enjoyed that way.

And here's my revised recipe:
3 cups Apples
1 Tablespoon Lemon Juice
1 teaspoon Cinnamon
1/2 teaspoon Nutmeg
1/3 cups Butter
3/4 cups Flour
3/4 cups Packed Brown Sugar
3/4 cups Oatmeal
1/4 teaspoon Baking Powder
1/4 teaspoon Baking Soda


Slice apples, toss with the lemon juice, cinnamon, and nutmeg, and layer in a 9 x 9 baking dish.

Combine all other ingredients, and then use a fork to smash the butter throughout the mixture.

Spread on top of the apples. Bake for 35 to 40 minutes at 350 degrees or until top is browned and apples are tender.

Wednesday, October 14, 2009

Applesauce

I've always loved homemade applesauce, but thought it would be too difficult to make at home.

Boy was I wrong. Applesauce is really pretty easy to make. I tried last fall for the first time, and lo and behold it actually turned out. And it was really good, too.

Earlier this year in Bloomington I promised my friend Sneha, who is also an applesauce fan, that I'd teach her how to make it for herself. But then we moved away before I got the chance. So on this here blog I'm going to attempt that lesson.

And I'm using a version of Short Stop's recipe.

First you take some apples.
1003_1452bl

The recipe calls for 3 lbs, which I found to be equivalent to one of these two bags.
1003_1455bl

First, you peel, core, and slice the apples. Last year I did that with a good old fashioned knife. This year, with all of my many apple-related plans in mind, I sprang for this contraption:
1003_1463bl
I found it from Williams Sonoma and it works beautifully. Worth every bit of our $28.

The only other ingredients you need are simple: sugar and cinnamon. Oh, and water.
1003_1458bl

After you slice up the apples, put them in a big pan. Add two-thirds of a cup of sugar (could be more, could be less, depending on how sweet you like it). Add a tablespoon of cinnamon and a cup of water, and turn the stove on to a low heat setting.

1003_1469bl

Put the top on the pot, and let the apples simmer for awhile.

I checked mine after a half hour and they looked like this:
1003_1475bl

Not quite ready. See how the apple piece stays on the fork? That means it is not done enough.
1003_1483bl

So I let it simmer awhile longer. And then checked it again.
1003_1484bl

Much better.
1003_1485bl

At this point I could have just taken that pot, and mashed the apples manually with fork or whisk or potato masher. This makes for great applesauce - just on the chunky side. But I like smooth applesauce, so just poured the stuff into my blender.
1003_1491bl

A couple of seconds later, it looked like this:
1003_1492bl

MMM MMM good.
1003_1497bl

Lemme at it. I love it best when it is warm.
1003_1507bl

1003_1513bl

And this recipe makes a decent amount of applesauce. Besides my bowl, I got three containers out of it. One for the fridge, two for the freezer.
1003_1515bl

If you want to save your applesauce to eat later, it does really well in the freezer. It can be in there for months, and all you need to do if you want to break into it is let it thaw in a refrigerator for a day. Easy.

My first batch of applesauce this season didn't make it a week.

Tuesday, October 13, 2009

Apple Dip

We love our apples around here. And by "we" I mean me.

Josh likes apples, but doesn't have the passionate love for them that I do.

But, for him, the scale tips to "love" when there is apple dip involved.

This is his mom's recipe:

8 oz. cream cheese (or the lower cal version works fine, too)
3/4 C brown sugar
dash cinnamon
dash nutmeg
1 t vanilla

Take the cream cheese out of the fridge and let it soften for a half hour or so. Put it in bowl and use a hand mixer to whip it up. Add all of the other ingredients and mix until blended.

And then...

Cut up some apples into slices.

And enjoy them together.
1003_1446bl

MMMM.
1003_1451bl

The dip tastes great without apples, too.
1003_1456bl

Monday, October 12, 2009

Fall Lovin'

Fall is BY FAR my favorite season. I get giddy just thinking about it.

The crisp air.
The jeans and sweatshirts.
The college football.
The change of colors.
Pumpkin Spice Lattes.
Apples.
Apple Cider.
Applesauce.
Apple Crisp.
Apple Dip.
(are you sensing a trend?)

To celebrate this glorious season, I dedicate this bloggy week to everything fall.

Fall3

First up: Apple Dip

Tuesday, October 6, 2009

My New Office

For this room, Josh gave me the green light to do whatever I wanted.

We don't always agree on colors, but for all other rooms were able to work out compromises.

This one was all me. Josh never would have gone for the orange/aqua combination. But I wanted something bright and cheery and a little off-beat.

My biggest need, however, was storage. Since I work from home, I have a lot of work-related equipment and supplies. I'm also into paper crafts (scrapbooking and card making, mostly) and have mountains of supplies and tools related to that hobby as well. I find that I'm much more crafty if my supplies are organized and easily accessible. As in, not stuck in a dark, overflowing closet.

For both work and crafts, ample work space was also pretty important to me.

Enter Ikea. Ikea has great mix-and-match office furniture (not to mention great prices, of course!) However, the limitless possibilities were a bit overwhelming to me. Which shelf? how many tables? Which table legs? How many drawer units? How should I configure everything, based on my room size? Which color?

Enter Ikea Hacker - a fabulous blog for ideas on how to configure Ikea products to fit your needs. I was especially inspired by this post.

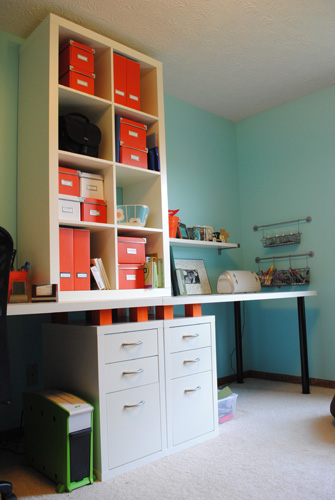
So one weekend, two trips to the Ikea in Cincinnati, many hours spent with screwdrivers in-hand, and multiple trips to a local hardware store later, we had it all put together.
bl0915_1138
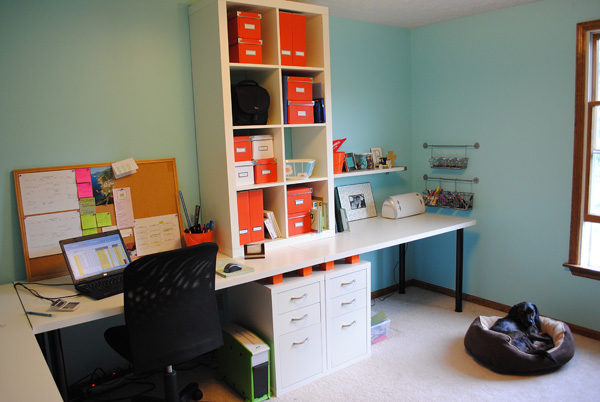
On the left - work-y stuff.
On the right - crafty stuff.

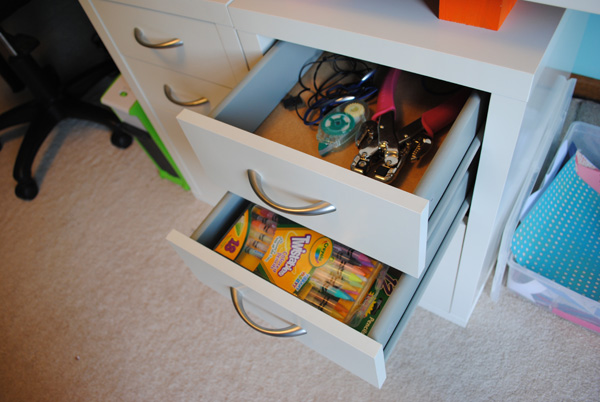
The drawers are organized like that, too.

Business on one side.
bl0915_1129

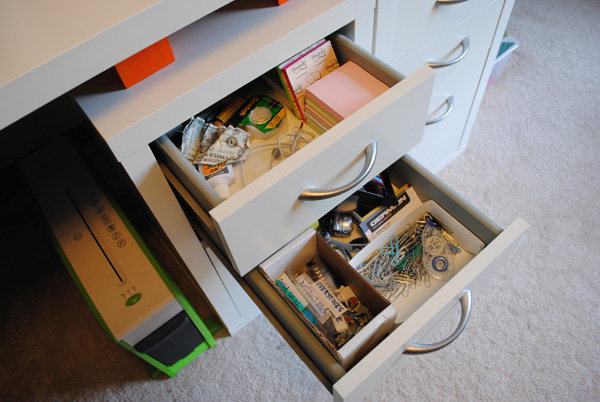
Party on the other side. Like a mullet for my room.
bl0915_1128

Let me assure you the office is rarely this neat. I'm a big believer in spreading out (which is where the extra work space comes in handy) and there are usually papers everywhere. For your benefit, I tidied things up before I started snapping pictures.
bl0915_1140

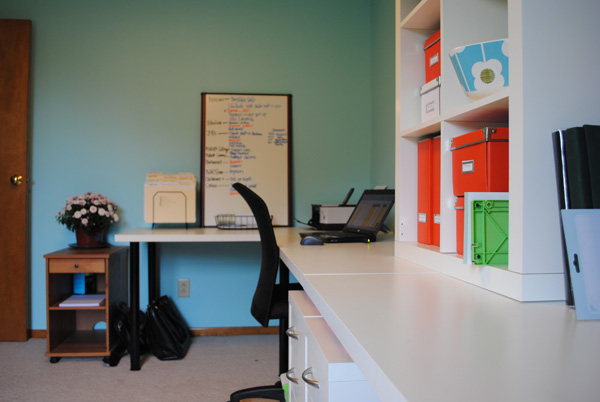
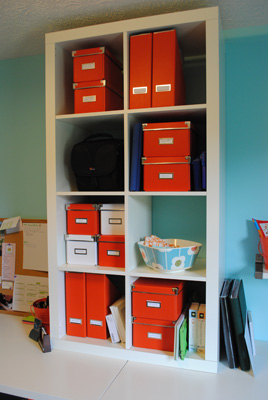
I was a bit concerned that this would be too tall for the room. But it fit - just barely!
bl0915_1110


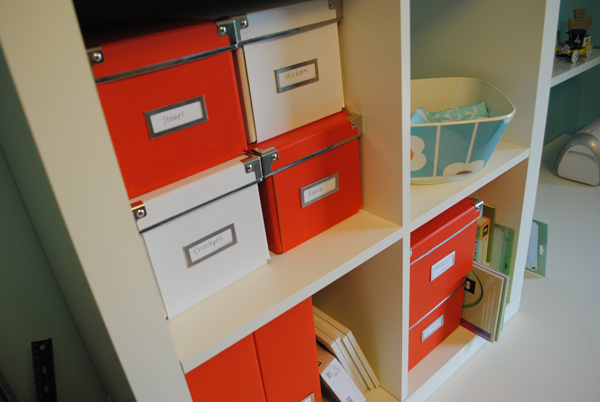
And all of these orange boxes? Also from Ikea. They're great for storing and organizing my assorted stickers, craft magazines, glue pens, ribbons, and envelopes. And at like $4 each, the boxes fit nicely into my price range.
bl0915_1142

One of the biggest challenges we faced was the fact that the drawer units weren't tall enough to match the table legs. But we eventually figured it out. I bought a 2 1/2 x 2 1/2 inch piece of wood, asked my neighbor to cut it into 3 inch chunks, and then spray painted each block orange. I attached them to the drawer unit and table top using a combination of wood glue and very long screws. And now that it is all set up I think the effect is kind of fun. Again, it's a little off-beat. And I like that.
BL0915_1113


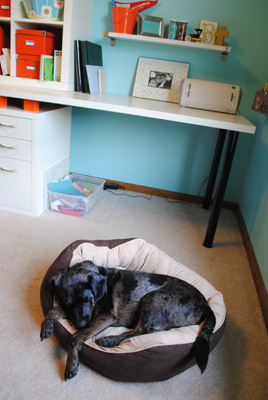
I'm not finished with the room yet. It could use some curtains. And a second chair. I have a couple of plan wood pieces in there (one of which didn't make it into any pictures) and I'd like to paint them to match. One of these days I want to get some artwork or something for the wall. Oh, and a matching bed for Riley - of course!

bl0915_1119

He loves the chocolate brown one you see here, but I've been searching all over the place for an orange one. But orange dog beds are a little difficult to find - no surprises there!

Enter AllModernPet.com. I'd actually browsed around on this website and some of its' sister websites in the past, and I think they have a great selection of attractive pet beds. More than that, they sell all kinds of nice, reasonably priced modern furniture, bedding, artwork, etc. We're pretty interested in a couple of beds (the kind for people, that is) they have for sale, since we're still on a mattress on the floor.

Somehow the folks at All Modern Pet found me and this blog, and asked if I'd review a dog bed (that they'd send me for free!) on this blog. UM YES PLEASE. They even let me pick out any bed I wanted withing a certain (generous) price range. I picked this one (which is orange, of course) and I'm totally excited to receive it in the mail sometime soon. Stay tuned.


Disclaimer:
I know that there are many opinions about bloggers partnering with companies in such a way. This isn't something I plan to do often, but when a great opportunity to get for free something I'd been looking for all summer presented itself, I jumped at the chance. And in my correspondence with this company I made it clear that I'd be up front with you, Internet, about where I got my dog bed. They, of course, agreed. I also plan to be as objective and honest as possible in my review.

Monday, October 5, 2009

Pacific Northwest, Part 4

I've so enjoyed sharing bits and pieces from our trip with you, Internet.

And to finish off our top ten, we've got this:

1. Sunset on the Coast

If we thought the coast during the day was wonderful, the sunset was even more so.

We decided to skip our dinner plans and head straight for the beach just before sunset. And then we spent a nice long time exploring the area, taking in the magnificent colors and ever-changing sky. Totally worth missing dinner.

Sunset

Friday, October 2, 2009

Pacific Northwest, Part 3

Sorry for the long hiatus from this series.  I was busy turning 26 and needed a few days off.

Just kidding.  I was simply out of town (and away from my main computer) for six days.

3. The Michigan Game at a Local Bar

For the most part, going on vacation does not get in the way of watching our Wolverines play football each fall. This trip was no exception, although we were a little concerned about just where we'd be able to go that had the game on TV. It wasn't a big enough game to get on any major network in that part of the country.

But we googled it, and found that the Alumni Association had chosen a specific bar in downtown Seattle for the season's worth of watching the games.

And so, at 9:00 am local time, we headed to a sports bar, and ended up watching the game with 150 other Michigan fans. Each and every TV in the place was tuned into the game, and there was standing room only in that place. We loved it.

Michigan Game

2. The Oregon Coast

We decided to take a leisurely drive alone the coast, having heard that it was a pretty place to go. Holy cow. It was magnificent.

Oregon Coast