Josh (on the phone to his friend while we were at the Apple Store):
Hey, I'm so sorry. I forgot about the Fantasy Draft tonight and will be late getting back for it. There's been an emergency.
My iPhone died.
***
No, our house hadn't caved in. No family members had died. Riley hadn't developed a serious illness. And I wasn't in labor. All situations that would constitute as emergencies in my book.
But the iPhone dying? Apparently that's an emergency to my husband.
I may never let him live that one down.
Tuesday, August 31, 2010
Thursday, August 26, 2010

Wednesday, August 25, 2010
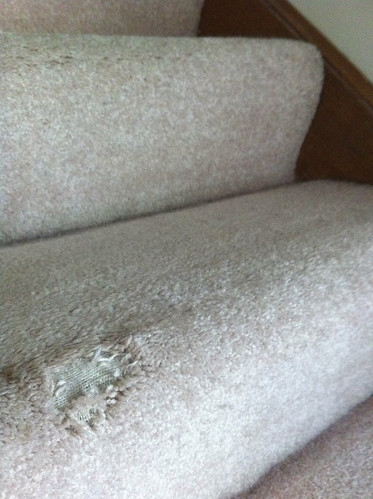
Our carpet-chewer.
Yesterday morning I found this delighful surprise on the stairs leading to the second floor:
I'm fairly confident I didn't do it. Josh was out of town. And the only other being in our house to blame?
This guy.
Now that he's all old (4) and lazy, he's almost completely trustworthy. And he has been so for years. The most mischief he gets into is a bi-monthly exploration of the trash can - and that's only after we've recently thrown away an empty bag that held shredded cheese. We were totally surprised that this happened.
However, we're still left with a very obvious carpet hole smack in the middle of our steps. Visible from the front door. Impossible to miss.
Thanks, Riley. Replacing carpet was not exactly what we had in mind for this fall, with, you know, a baby on the way.
So now... what do we do about it?
I feel we have a few options - and please weigh in!
1. NOTHING. Leave it. Since we'll soon be in the "small children at home" phase of our life, is there any point to replacing carpet now, knowing that we may well need to do it again in a few years?
2. Re-carpet the stairs only. They are whitish (not my favorite) - and dingy - and worn, anyway.
3. Re-carpet the stairs and hallway. The hallway sports the same white carpeting, which has also seen better days. Plus the hallway upstairs connects very obviously to the stairs and so doing both at once would give us some cohesion.
4. Re-carpet the entire 2nd floor. All four bedrooms + the hallway + the stairs share the same carpet, and we like the seamless look from room to room. However, a re-do of carpeting on the entire second story wasn't exactly an expenditure we'd had in mind for this year.
I'm fairly confident I didn't do it. Josh was out of town. And the only other being in our house to blame?
This guy.

Now that he's all old (4) and lazy, he's almost completely trustworthy. And he has been so for years. The most mischief he gets into is a bi-monthly exploration of the trash can - and that's only after we've recently thrown away an empty bag that held shredded cheese. We were totally surprised that this happened.
However, we're still left with a very obvious carpet hole smack in the middle of our steps. Visible from the front door. Impossible to miss.

Thanks, Riley. Replacing carpet was not exactly what we had in mind for this fall, with, you know, a baby on the way.
So now... what do we do about it?
I feel we have a few options - and please weigh in!
1. NOTHING. Leave it. Since we'll soon be in the "small children at home" phase of our life, is there any point to replacing carpet now, knowing that we may well need to do it again in a few years?
2. Re-carpet the stairs only. They are whitish (not my favorite) - and dingy - and worn, anyway.
3. Re-carpet the stairs and hallway. The hallway sports the same white carpeting, which has also seen better days. Plus the hallway upstairs connects very obviously to the stairs and so doing both at once would give us some cohesion.
4. Re-carpet the entire 2nd floor. All four bedrooms + the hallway + the stairs share the same carpet, and we like the seamless look from room to room. However, a re-do of carpeting on the entire second story wasn't exactly an expenditure we'd had in mind for this year.
Tuesday, August 24, 2010
A few more little projects.
They were all easy to make and inexpensive.
They required little or no sewing. (Not that I really mind sewing... I'm just not that great at it.)
And we like seeing the little pops of color and flair that these little craft projects give our nursery.
1. A basket liner.
We're all about a neutral baby room 'round here... for the most part. But since we're expecting a girl it's fun to throw in a little pink here or there. Especially in places that could be easily switched up should we use this nursery for a little boy someday.
Much as I love our bookshelves, they aren't close enough to our nursing/reading chair to be able to easily grab a few books. So we bought a cheap basket at Homegoods, and I thought it needed a splash of pink for fun.
I've got no instructions, no tutorial, no before/afters. (The horror!) But with the help of my friend Lora, I managed to use Heat n' Bond tape + a small bit of sewing to line the basket.

It'll be great to have a few favorite books an an arm's reach.
2. A tin tub liner.
Same song, second verse. We bought this cute little tub at IKEA a few weeks ago, and I thought it would come in handy as a diaper changing supply catch-all that sits on top of the dresser. We plan to get a foam mat & coordinating pad and put it up there next to the tin tub for a changing station.
But of course, it needed some pink, too.

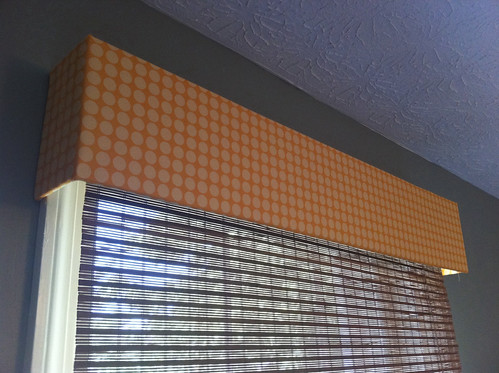
3. A simple cornice.
We hung up a basic shade to cover the window, but it looked a little blah. However, we had some cute fabrics to use here and there throughout the room and quickly came up with the idea of making a little cornice.
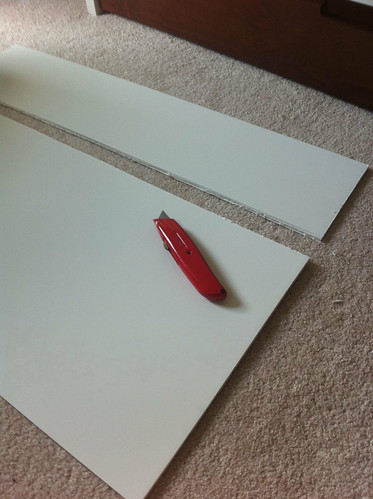
I vaguely remembered making a couple cornices with my mom for my room when I was a teenager. So with that distant memory in mind, I headed for the craft store. Foam board was on sale for $1 per sheet, so I picked up a few sheets and brought them home. I measured the window frame, and then set to work with an exacto knife, tape measure, and hot glue to make a little box.
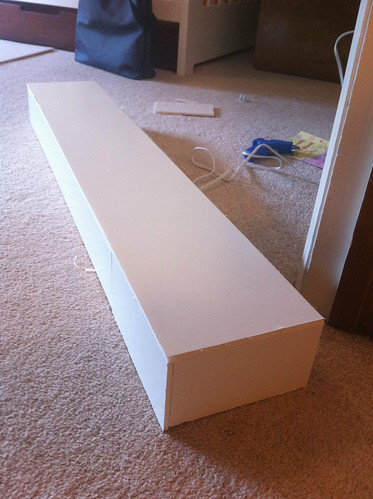
Then I tried it out and hung it right on top of the shade - no additional hardware needed.
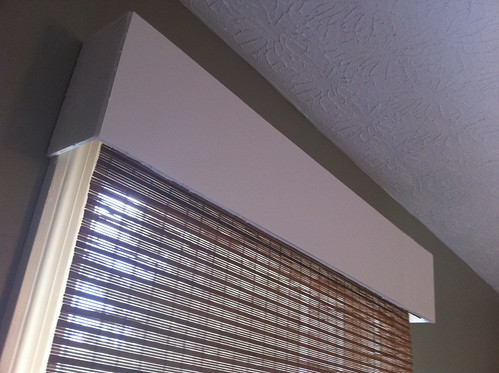
And then for the fun part. Adding fabric. I just cut out enough yellow and orange polka dotted fabric (the same as the crib skirt) and wrapped it around the foam board box. I used Tacky Glue as my adhesive (hot glue dries too fast sometimes) and then hung the whole thing in place 10 minutes later.
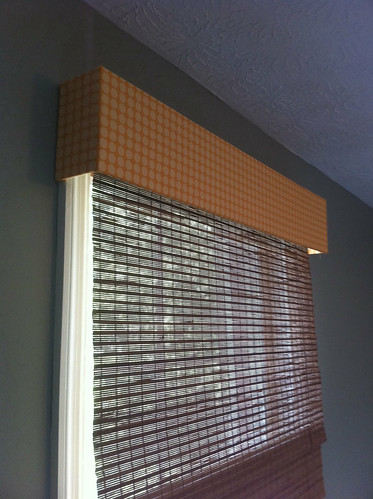
Blah window covering? Spiced up. Another splash of orangey yellow thrown somewhere, for the sake of consistency? Done. The cost? I already had the fabric, the knife, and the glue, so... $2. Just the foam board. If you were starting from scratch? $15-20, maybe?
So there's a peek into some simple, quick little projects that we've been working on around here. Next stop? Some art for the walls...

They required little or no sewing. (Not that I really mind sewing... I'm just not that great at it.)
And we like seeing the little pops of color and flair that these little craft projects give our nursery.
1. A basket liner.
We're all about a neutral baby room 'round here... for the most part. But since we're expecting a girl it's fun to throw in a little pink here or there. Especially in places that could be easily switched up should we use this nursery for a little boy someday.
Much as I love our bookshelves, they aren't close enough to our nursing/reading chair to be able to easily grab a few books. So we bought a cheap basket at Homegoods, and I thought it needed a splash of pink for fun.
I've got no instructions, no tutorial, no before/afters. (The horror!) But with the help of my friend Lora, I managed to use Heat n' Bond tape + a small bit of sewing to line the basket.
It'll be great to have a few favorite books an an arm's reach.
2. A tin tub liner.
Same song, second verse. We bought this cute little tub at IKEA a few weeks ago, and I thought it would come in handy as a diaper changing supply catch-all that sits on top of the dresser. We plan to get a foam mat & coordinating pad and put it up there next to the tin tub for a changing station.
But of course, it needed some pink, too.
3. A simple cornice.
We hung up a basic shade to cover the window, but it looked a little blah. However, we had some cute fabrics to use here and there throughout the room and quickly came up with the idea of making a little cornice.
I vaguely remembered making a couple cornices with my mom for my room when I was a teenager. So with that distant memory in mind, I headed for the craft store. Foam board was on sale for $1 per sheet, so I picked up a few sheets and brought them home. I measured the window frame, and then set to work with an exacto knife, tape measure, and hot glue to make a little box.
Then I tried it out and hung it right on top of the shade - no additional hardware needed.
And then for the fun part. Adding fabric. I just cut out enough yellow and orange polka dotted fabric (the same as the crib skirt) and wrapped it around the foam board box. I used Tacky Glue as my adhesive (hot glue dries too fast sometimes) and then hung the whole thing in place 10 minutes later.
Blah window covering? Spiced up. Another splash of orangey yellow thrown somewhere, for the sake of consistency? Done. The cost? I already had the fabric, the knife, and the glue, so... $2. Just the foam board. If you were starting from scratch? $15-20, maybe?
So there's a peek into some simple, quick little projects that we've been working on around here. Next stop? Some art for the walls...
Monday, August 23, 2010
Small changes.
Why DOES it take us so long to change things around the house that we hate?
Like our garbage can. When we first got married we bought one at IKEA. It was white and usually looked dingy. Standard sized bags never fit. We kept that thing around for FIVE YEARS. It moved with us from Michigan to Indiana to Ohio. And we'd hated it from day one.
And yet, we didn't want to spend the cash to get what we really wanted - a somewhat-attractive stainless steel kind.
But Friday night, we took the plunge. Josh was so excited - and still is. He calls it "the most cathartic purchase he's ever made." It took us five long years, but finally - FINALLY - we replaced it with one of these:

I've also been thinking lately about why I haven't been blogging. I think it boils down to a few reasons...
5. Pure laziness.
4. I'm a little extra tired these days (I know, it's cliche).
3. I don't feel like I have that much to say. But that's probably me just being lazy.
2. My back starts hurting when I sit upright at a computer for too long. Since I do that most days for my job, spending extra time on the computer isn't overly appealing. And it's difficult to type laying down!
1. This chair is so, so, uncomfortable. Which makes #2 a lot worse.

Solution? BUY A NEW CHAIR ALREADY.
This chair is one we stole from the dining room table set. We'd always planned on purchasing a new chair for this spot. Like when we first put the room together last summer. And here it is, a year later, and we'd never made that chair purchase a priority.
But today, we made another purchase.

I can't wait for it to come in the mail later this week. Hopefully it's comfortable! It had good ratings.
I think it will help me blog a bit more. In any case, it can't hurt. We'll see.
Like our garbage can. When we first got married we bought one at IKEA. It was white and usually looked dingy. Standard sized bags never fit. We kept that thing around for FIVE YEARS. It moved with us from Michigan to Indiana to Ohio. And we'd hated it from day one.
And yet, we didn't want to spend the cash to get what we really wanted - a somewhat-attractive stainless steel kind.
But Friday night, we took the plunge. Josh was so excited - and still is. He calls it "the most cathartic purchase he's ever made." It took us five long years, but finally - FINALLY - we replaced it with one of these:
I've also been thinking lately about why I haven't been blogging. I think it boils down to a few reasons...
5. Pure laziness.
4. I'm a little extra tired these days (I know, it's cliche).
3. I don't feel like I have that much to say. But that's probably me just being lazy.
2. My back starts hurting when I sit upright at a computer for too long. Since I do that most days for my job, spending extra time on the computer isn't overly appealing. And it's difficult to type laying down!
1. This chair is so, so, uncomfortable. Which makes #2 a lot worse.
Solution? BUY A NEW CHAIR ALREADY.
This chair is one we stole from the dining room table set. We'd always planned on purchasing a new chair for this spot. Like when we first put the room together last summer. And here it is, a year later, and we'd never made that chair purchase a priority.
But today, we made another purchase.
I can't wait for it to come in the mail later this week. Hopefully it's comfortable! It had good ratings.
I think it will help me blog a bit more. In any case, it can't hurt. We'll see.
Sunday, August 22, 2010
Grandmas.
Our little nugget has FOUR great-grandmas.

And all of them were at my baby shower last week.
What a blessing.
And all of them were at my baby shower last week.
What a blessing.
Thursday, August 19, 2010
A prayer for our baby.
Lord Jesus,
Thank you for so tenderly knitting this child together.
Please continue to develop her little body according to your perfect plan. I know we’ll be amazed at your work when we see her.
Bless her birth. I pray we hear a loud wail as she makes her debut. Keep us both healthy until that day - and beyond it.
I know I have no other options than to put my trust in you.
I pray she grows up happy and strong.
I pray she learns to walk with you daily.
I pray she lives a life of joy and peace and security and hope and laughter.
And Lord, please, please give us wisdom as we parent this child. We will need your guidance desperately throughout her life. Give us the tools we need to shepherd her little heart. Give us direction when we find ourselves at a crossroads. Help us to make the very best decisions about her safety, health, and care.
Bless our marriage in such a way that she instinctively understands a little bit about you when she observes us with each other.
Thank you for the opportunity to carry this child. Thank you for the undeserved, unexpected gift she already is to us.
Wednesday, August 4, 2010
Fake Cocktail
Obviously, real cocktails are "out" for me this summer. I do miss the occasional G&T or screwdriver, I must admit.
What's a pregnant girl to do? Whip up an alternative.
Half OJ, half Sprite or 7up. Over ice. Add some lime juice.
And now I'm totally addicted. It's light. It's refreshing. I can drink it during my work day. And most importantly, it won't harm the nugget. A perfect summer treat.
I can knock quite a few of these puppies back, let me just tell you.
What's a pregnant girl to do? Whip up an alternative.
Half OJ, half Sprite or 7up. Over ice. Add some lime juice.

And now I'm totally addicted. It's light. It's refreshing. I can drink it during my work day. And most importantly, it won't harm the nugget. A perfect summer treat.
I can knock quite a few of these puppies back, let me just tell you.

Monday, August 2, 2010
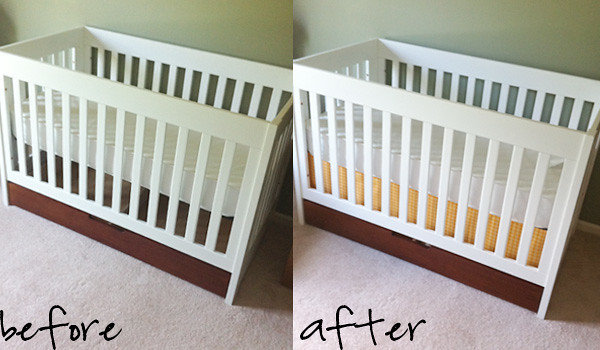
Easy Peasy Crib Skirt
It took less than an hour. And for a good chunk of that I was chatting to friends and family on the phone, meaning that it didn't exactly take my whole concentration. There was no sewing involved - just some quality time with the iron.
And it cost around $30.
It could have been cheaper only I fell in love with some yellowy orange-y polka dotted fabric and couldn't pass it up.
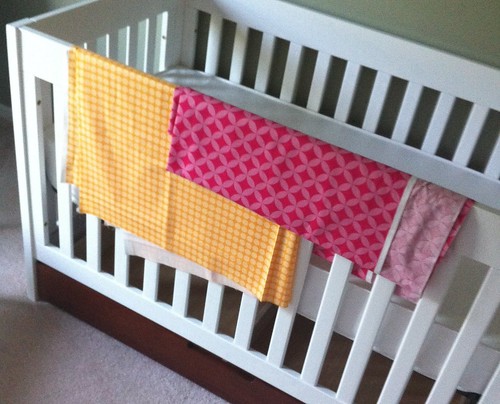
We'll use that pink one for other little projects.
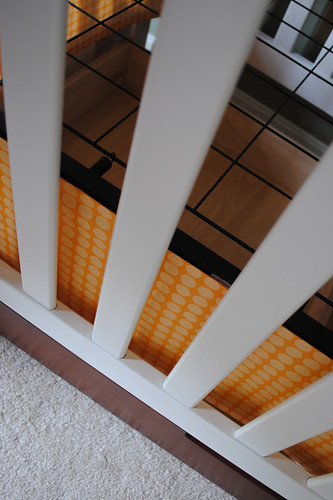
Here's our crib:
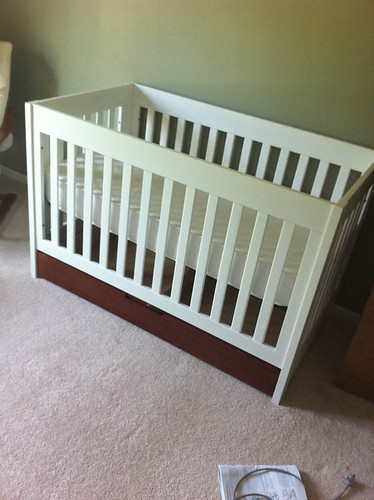
It was always our plan to go with some DIY crib bedding + basic solids for sheets, as opposed to an entire bedding set. For one, we have more control over the fabric selection. For two, it's a much cheaper option, which works out nicely in our baby room budget!
We'll only use this crib skirt until she's big enough to pull herself up - at which time we'll drop the mattress down to the bottom position on the crib so she can't climb out. And once the mattress is down all the way it'll sit right on top of the storage drawer - no skirt needed.
I followed the great directions from Young House Love (my favorite DIY/decorating blog!) and was totally impressed with the sheer simplicity of it.
The crib skirt only needed to cover the gap between the raised mattress and the storage drawer. I started out by measuring the space I needed to cover, and jotting some notes. I added 2 inches to each measurement so that I would cut enough material to be able to hem up the sides.
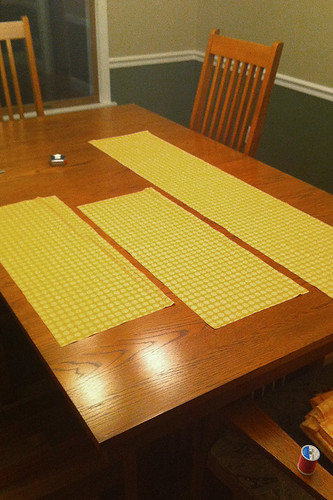
I laid out the yellow fabric on our dining room table, and measured out the pieces. Thankfully this material has a nice, regular pattern. It made for easy measuring and cutting! I'm sure that most seamstresses would frown on the use of an ink pen, but I knew those marks wouldn't be seen.

After cutting, I had three separate panels - one long one for the front and two smaller ones for the sides. I figured that since the back of the crib is against the wall, a fourth panel wasn't needed. I'll save that material for other things, rest assured!
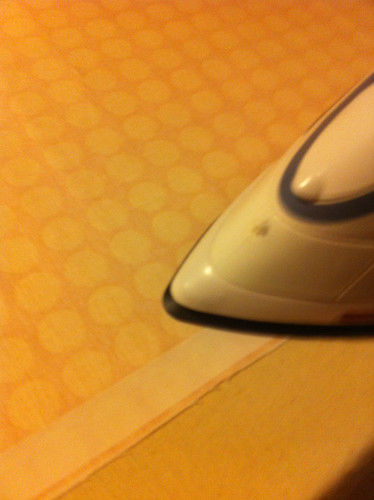
I then ironed Heat n' Bond tape onto the very edge of the flipside/underside of the panel. Once it cooled, I took off the paper and folded it over. One more run across with the iron, and it was set. I repeated this process for all four edges of all three panels. A quick and easy hem. No sewing needed.
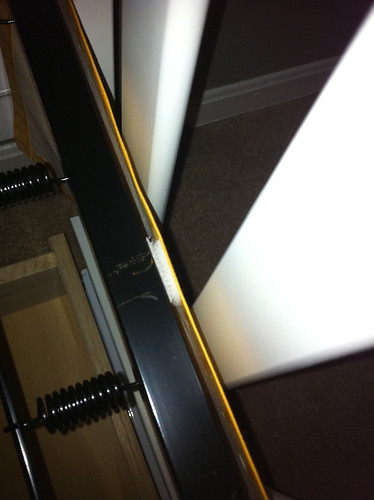
To attach the three panels, I simply used little strips of velcro. Hot glue holds one velcro side to the metal part of the crib. Heat n' Bond tape holds the other velcro side to the top of each panel. And yes, that's some crayon I used to mark out where to glue on the velcro. But since we put the mattress right on top of the metal, we'll never see those marks.
And now? $30 and 45 minutes later?
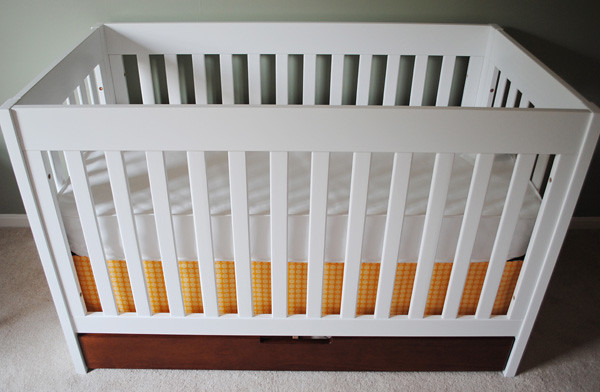
It's exactly what we were looking for.

Now we just need some coordinating sheets - AND a baby, of course.
And it cost around $30.
It could have been cheaper only I fell in love with some yellowy orange-y polka dotted fabric and couldn't pass it up.
We'll use that pink one for other little projects.
Here's our crib:
It was always our plan to go with some DIY crib bedding + basic solids for sheets, as opposed to an entire bedding set. For one, we have more control over the fabric selection. For two, it's a much cheaper option, which works out nicely in our baby room budget!
We'll only use this crib skirt until she's big enough to pull herself up - at which time we'll drop the mattress down to the bottom position on the crib so she can't climb out. And once the mattress is down all the way it'll sit right on top of the storage drawer - no skirt needed.
I followed the great directions from Young House Love (my favorite DIY/decorating blog!) and was totally impressed with the sheer simplicity of it.
The crib skirt only needed to cover the gap between the raised mattress and the storage drawer. I started out by measuring the space I needed to cover, and jotting some notes. I added 2 inches to each measurement so that I would cut enough material to be able to hem up the sides.
I laid out the yellow fabric on our dining room table, and measured out the pieces. Thankfully this material has a nice, regular pattern. It made for easy measuring and cutting! I'm sure that most seamstresses would frown on the use of an ink pen, but I knew those marks wouldn't be seen.
After cutting, I had three separate panels - one long one for the front and two smaller ones for the sides. I figured that since the back of the crib is against the wall, a fourth panel wasn't needed. I'll save that material for other things, rest assured!
I then ironed Heat n' Bond tape onto the very edge of the flipside/underside of the panel. Once it cooled, I took off the paper and folded it over. One more run across with the iron, and it was set. I repeated this process for all four edges of all three panels. A quick and easy hem. No sewing needed.
To attach the three panels, I simply used little strips of velcro. Hot glue holds one velcro side to the metal part of the crib. Heat n' Bond tape holds the other velcro side to the top of each panel. And yes, that's some crayon I used to mark out where to glue on the velcro. But since we put the mattress right on top of the metal, we'll never see those marks.
And now? $30 and 45 minutes later?
It's exactly what we were looking for.
Now we just need some coordinating sheets - AND a baby, of course.
Subscribe to:
Posts (Atom)